| How to Draw People
The Art History Archive - Art Lessons
How to Draw or Paint PeopleBy Charles Moffat, Canadian Artist - 2006. Updated 2008. "Anyone can learn how to draw if they simply practice drawing. The so-called 'naturally artistic' people simply have had more practice."
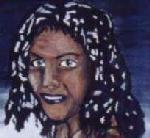
FACES:Some would argue that the face is the most difficult thing to learn how to draw. Especially if you don't have a person right in front of you, right? Wrong. A person's face is actually quite mathematically proportioned. Once you know the math involved it becomes easy.
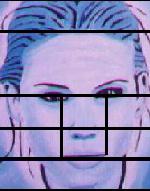
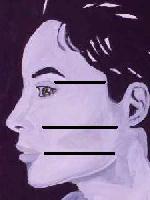
Lets start with the basic "mug shots": A frontal view and a side view. When drawing a face, most people draw an oval and then stick the nose in the middle. This is WRONG. If you actually measure your own face, you will find its actually your eyes that are in the middle. (You can quickly measure this yourself using the tip of your thumb and the tip of your little finger. Measure the distance between your chin and the middle of your eyes. Then keep your hand in the same position and move it so you are measuring from the middle of your eyes to the top of your head. Its the same distance! What confuses people is that they don't realize that their eyebrows, forehead and hair takes up so much space. Depending on how puffy the hair is, it can be even more space. Once you get that problem solved, its only a matter of time before you realize the proportions of the rest of the face.
For example, the top of the eyes lines up with the top of the ears (you can see this better in a view from the side). The tip of the nose is even with the bottom of the ears. The corner of the mouth is even with the corner of the jaw. Keep in mind also that these proportions are essentially "guidelines", not rules. If the face is tilted to the side, or tilted forwards or backwards, it will make a big difference.
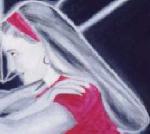
When drawing hair, its best not to just draw lines in the direction that the hair is going. Instead, ignore the individual hairs and draw the shadows in the hair instead. Pay attention to the shadows and the overall shape and feeling of hair will emerge. Pay attention to what spots in the hair are dark, what spots reflect light, differences in colour and then shade accordingly. Pretend that you are drawing drapes or a crumpled up piece of cloth. Any stray hairs you can draw individually.
In some cases the hair will be so dark or contrasted that you can simply block out areas of colour. The contrast of the two in the final piece will be more realistic and people often won't realize that you've simplified it because it still looks realistic. Pay attention to mood. Its not just a matter of whether the person LOOKS sad, scared, or happy... but whether you WANT them to look sad, scared or happy. If their mouth is open and there is a bit of lift in the corners of their mouth and their cheeks, they will look happy. Firmness of jaw, whiteness of face as if they have gone pale with fear (or even a worried look in their eyes) will make a person look afraid.
If you have problems drawing a particular part of the face, take a separate piece of paper and draw at least ten versions of it. Ten lips, ten eyes, ten ears, ten noses. Whatever it is you're having a problem with. Practice that until you feel comfortable at it.
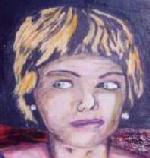
Otherwise your main concern, once you have the proportions set should be shading. The shading around the nose, around the eyes, the mouth, the corners of the neck, creases or wrinkles. All these things are a matter of shading. If you're drawing with a pencil or charcoal, don't be afraid to smudge things with a dry finger. Hatching and cross-hatching are but two ways to apply shading. You can also just scribble circles in spots you want it to be darker (and then smudge it with your thumb), apply dots or stippling (some people call it pointillism). Whatever method you feel is right for that location. AND MAKE IT DARKER! If you stand back from your image and it still looks like a blank piece of paper from six meters away, then you haven't drawn it dark enough. Go back and create a stronger contrast between light and dark. Black places should be BLACK, not grey. Use a black pen if necessary.
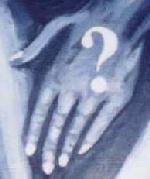
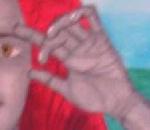
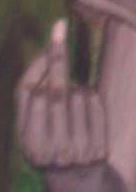
HANDS & FEET:Some people argue that hands are the hardest to draw, but again its just a matter of practice. If you can master hands, you may also wish to practice drawing feet (which is equally as easy/difficult as hands).
The trick to drawing hands is that you have to pay attention to the shape of everything, and all the shading is confined to a much smaller area. It takes a lot of shading to do, but once its done it looks spectacularly real. So if you want practice shading, hands and feet are a good way to start. Pay attention to the creases in the knuckles and the way light reflects off of fingernails and toenails.
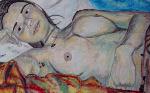
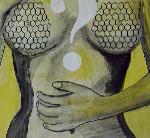
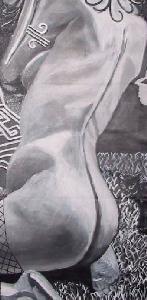
THE TORSO, LEGS & ARMS:Any male with working eyes and working hands should be able to draw breasts, but thats the problem. They almost always draw ONLY the breasts. They ignore other issues like the belly button, the rib cage, the neck, shoulders, hips, etc. Its a huge long list of bodily features, and males tend to focus only on the two parts that are shaped like targets in a shooting gallery.
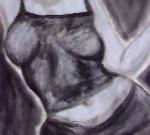
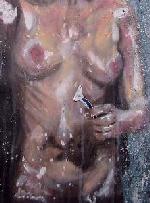
And if you're drawing a male, then its a matter of knowing where the chest muscles are, paying attention to the shading and NOT overdoing it. Some men and women tend to over-emphasize muscles when drawing. Thats what I mean by overdoing it. They become so obsessed with drawing the muscles instead of the FLESH that they end with a drawing that looks the person is on steroids. Pay attention to where the bones are, where tendons stick out, where there is lumps of flesh or fat. Make sure the shape is accurate. If its not, try drawing it alone on a separate piece of paper until it does look accurate.
Don't pay attention to body hair until the entire piece is done. You can go back and add hair later. Pay attention to shading and shape and you will learn as you progress. When something looks wrong, go ahead and practice that particular part on a separate piece of paper.
DRAWING TIPS 101:#1. Many artists find inspiration in magazines and copy from other people. While its not very original to pastiche (the artistic word for "borrowing an idea"), its something that EVERYONE does anyway. So don't worry about it. Regardless, copying things is a great way to practice and develop your own artistic style. #2. Anyone can trace something, so don't bother. Just pay attention to the shape and lines of something, whether its from a magazine or from real life. If its a little off, no one will notice anyway.
#3. When reproducing large/complicated things and you want to do a really good job of it, use a graph. #4. If something seems to complex or difficult, take a break and practice that one specific aspect of it. Maybe you have problems drawings noses. Draw 20 noses on separate sheets of paper. #5. Pay attention to size. Don't elongate things when they don't need to be. Measure the length of it FIRST, and then draw it. Don't just start drawing it, because then you'll make it larger or smaller than you originally intended. "Measure it twice, draw it once."
#6. When shading, ignore white spaces. You don't need to worry about those. Look only for the dark spots and work on those. Make sure the amount of darkness is accurate. #7. If you can, make the switch to charcoal, chalk and kleenex. You don't need an eraser. If you make a mistake with the charcoal, just fix it with the chalk (or vice versa). When you want to smudge something use a piece of kleenex. (See #10 below about fixatives.)
#8. Pay attention to the background. Some people like to sketch the background in first, or make the paper completely grey before they begin. Then they can go back and make places darker (or use an eraser or chalk to make them lighter). Drawing with an eraser is called "subtractive drawing". #9. When necessary, research your topic. If you're drawing birds, find a book about birds and look closely at the pictures in it. Ignore what your mind tells you and pay attention to what your eyes actually see. Look for the different shapes/colours and try to imagine how to draw them. #10. When you're COMPLETELY finished drawing and you want to save your work so it doesn't get smudged you need a fixative. A cheap and easy to use fixative: Hairspray. (Don't spray it near an open flame unless you feel like lighting your picture on fire!.)
|
|
For Art Lessons in the Downtown Toronto Area:
| |